


The modern vehicle’s dashboard serves as a vital interface between the driver and the car’s performance. Featuring various lights that indicate everything from fuel levels to engine malfunctions, understanding the meaning behind these dashboard indicators is crucial for safe driving. However, when these lights begin to illuminate unexpectedly, it can lead to confusion and anxiety for the driver.
Often, these codes can signify minor issues, while in other cases, they might point to something more serious that requires immediate attention. Knowing how to read the dashboard lights and diagnose the issues can save you time and money, allowing you to take appropriate actions before they escalate. In this article, we will explore practical steps to troubleshoot and resolve common dashboard light errors efficiently, ensuring that your vehicle remains in optimal condition.
Identifying Common Warning Codes on Your Dashboard
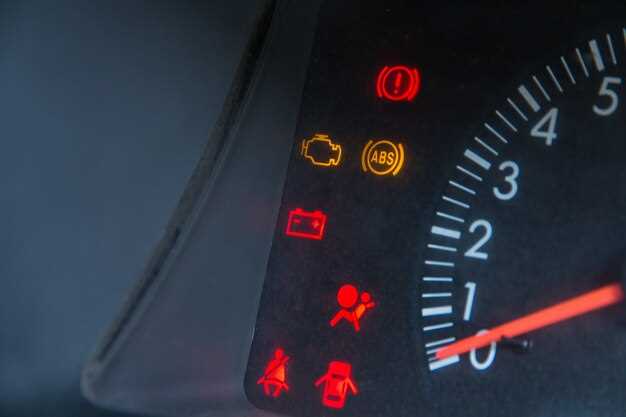
Your vehicle’s dashboard is equipped with various warning lights that communicate important information about its condition. Recognizing these codes promptly is essential for maintaining your car’s health. Here are some of the most common warning codes you might see on your dashboard, along with their meanings.
One frequent warning is the “Check Engine” light, indicated by an illuminated engine symbol. This code can signal a range of issues, from a loose gas cap to severe engine troubles. It is advisable to have the vehicle scanned to pinpoint the exact cause.
The battery warning light generally appears as a battery icon and indicates potential problems with your vehicle’s charging system, such as a failing alternator or battery. Ignoring this code can lead to battery failure and leave you stranded.
The oil pressure warning, represented by an oil can symbol, signifies that the oil pressure level is too low. This could result from low oil levels or a more serious engine problem. Immediate attention is necessary to prevent engine failure.
A brake warning light often shows as an exclamation mark inside a circle or an “ABS” symbol. This code alerts you to issues in the braking system, such as low brake fluid or an active anti-lock braking system malfunction. Prioritizing a check-up is critical for safety.
The temperature warning light, typically shaped like a thermometer, indicates that the engine is overheating. The vehicle should be stopped immediately to avoid engine damage. Ensuring your cooling system is functioning properly is crucial.
In order to avoid further complications, it is vital to consult your vehicle’s owner manual for specific codes related to your make and model. Understanding warning codes displayed on your dashboard can help you take timely action and maintain your vehicle’s performance smoothly.
Troubleshooting Common Dashboard Light Issues

Dashboard lights serve as critical indicators of your vehicle’s health. When these warning lights activate, understanding the underlying issues is essential. One of the first steps in troubleshooting is to check the vehicle’s diagnostic codes using an OBD-II scanner. This tool translates the warning lights into specific codes that can help identify the root cause of the problem.
Common dashboard warning lights include the check engine light, battery warning light, and oil pressure warning light. The check engine light may illuminate due to various issues, ranging from a loose gas cap to serious engine malfunctions. By retrieving the corresponding code, you can narrow down the potential issues, enabling targeted repairs.
The battery warning light indicates problems with the vehicle’s charging system. This could stem from a faulty alternator, a bad battery, or poor connections. Again, diagnostic codes can provide insight into where the issue lies, simplifying the troubleshooting process.
Oil pressure warning lights alert drivers to low oil pressure, which could be due to low oil levels, a faulty oil pump, or a clogged oil filter. It is necessary to check both the oil level and the oil quality, and using a scanner can help determine if there’s a related code indicating a specific failure.
To effectively address dashboard light issues, always refer to your vehicle’s manual for guidance on specific warning lights and their meanings. Utilizing diagnostic codes in conjunction with professional advice can ensure that repairs are not only effective but also timely, ultimately extending the life of your vehicle.
Step-by-Step Guide to Resetting Dashboard Lights
Resetting dashboard lights is an essential task for any vehicle owner. It helps eliminate warning signals that could indicate issues with your car, and allows for better monitoring of vehicle health. Follow these steps to reset your dashboard lights efficiently.
Step 1: Identify the Warning Light
Before resetting, determine which warning light is illuminated on your dashboard. Common lights include the check engine light, oil pressure warning, and battery alert. Use your vehicle’s manual to find the associated warning codes for accurate troubleshooting.
Step 2: Diagnose the Issue
Use an OBD-II scanner to read the diagnostic trouble codes (DTCs) related to your vehicle. This step helps you understand the underlying issue causing the dashboard light to turn on. Take note of any codes displayed, as resolving the problem may be necessary before resetting the lights.
Step 3: Address the Problem
If the diagnostic codes indicate a specific issue, address it before proceeding. This may involve checking fluid levels, replacing faulty sensors, or fixing mechanical problems. Failing to resolve the issue could lead to recurring warning lights.
Step 4: Disconnect the Battery
To reset the dashboard lights, you can disconnect the vehicle’s battery. Start by turning off your car and unfastening the negative terminal of the battery. Wait for about 15 minutes, then reconnect the terminal. This method clears the memory and can reset the lights.
Step 5: Use the OBD-II Scanner
If you have access to an OBD-II scanner, connect it to the vehicle’s diagnostic port. After the scanner is linked, navigate to the option to clear or reset the codes. Follow the prompts, and once the process is complete, the dashboard lights should turn off.
Step 6: Verify the Reset
After resetting, start your vehicle and observe the dashboard. Ensure that the warning lights are off. If the lights reappear shortly after the reset, recheck the diagnostic codes for persistent issues.
Step 7: Regular Maintenance
To prevent dashboard light warnings from occurring frequently, conduct regular maintenance on your vehicle. Check fluids, brakes, tires, and engine performance to ensure everything operates smoothly. Staying proactive helps prolong the life of your vehicle and reduces unexpected dashboard alerts.


