


Testing your car battery at home is a vital skill every car owner should possess. A well-functioning battery is essential for the reliable operation of your vehicle, and being able to assess its health can save you from unexpected breakdowns. Fortunately, you don’t need to be a mechanic or have specialized tools to perform a basic battery test; a simple voltmeter will suffice.
In this guide, we will walk you through the step-by-step process of testing your car battery. You’ll learn how to use a voltmeter to determine the voltage levels of your battery and interpret the results to understand its condition. By the end of this article, you’ll be equipped with the knowledge and confidence to conduct a thorough battery test at home, ensuring your vehicle remains reliable and efficient on the road.
Before diving into the testing process, ensure that you have your voltmeter ready and that you understand the necessary safety precautions. Following the outlined steps will help you accurately assess your battery’s state and decide whether it’s time for a replacement or further maintenance.
Identify Signs of a Weak Car Battery Before Testing
Before you proceed to test your car battery, it is essential to recognize the signs that indicate it may be weakening. One of the most common indicators is difficulty starting the engine. If you notice that your car takes longer to crank or the engine hesitates before starting, this could signal a weak battery.
Another sign to watch for is dimming headlights. When you turn on your vehicle, if the headlights appear noticeably dimmer than usual, it may indicate that the battery is not providing sufficient power. Additionally, dashboard warning lights can also be a clue; if the battery light stays illuminated while driving, it may be time to investigate further.
Frequent electrical issues can also point to a failing battery. If you’ve experienced problems with the radio, power windows, or other electrical components, the battery might not be able to deliver the necessary voltage. A sudden drop in electrical performance while using these features can be a major red flag.
Examine the physical condition of the battery as well. Signs of corrosion around the terminals, swelling, or cracks in the battery casing suggest deterioration. These physical indicators can seriously impact battery performance, indicating it’s time to test its voltage levels with a voltmeter.
By identifying these signs early, you can take the necessary steps to test your car battery, ensuring that your vehicle remains reliable and safe on the road.
Properly Use a Voltmeter for Accurate Battery Measurement
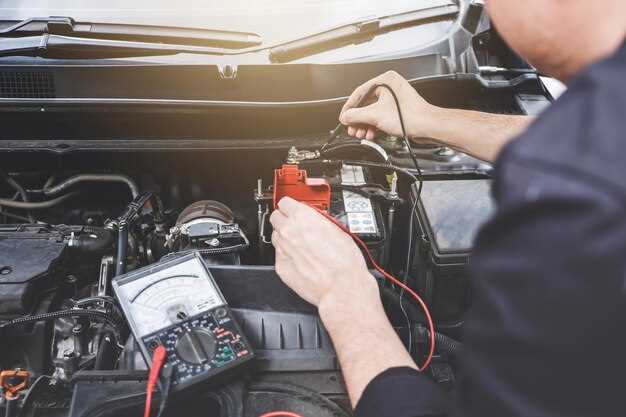
Testing your car battery with a voltmeter is essential for diagnosing its condition. Follow these steps to ensure accurate measurements:
- Gather Your Tools:
- Digital or analog voltmeter
- Safety gloves
- Safety goggles
- Prepare the Vehicle:
Turn off the engine and all electrical accessories to avoid any interference during the test.
- Access the Battery:
Locate your car battery, which is usually found under the hood. If necessary, remove any covers or obstacles for clear access.
- Set Up the Voltmeter:
Turn the voltmeter on and set it to the DC voltage setting. This setting is usually indicated by a “V” followed by a straight line.
- Connect the Voltmeter:
Attach the probes of the voltmeter:
- Connect the red probe to the positive terminal (+)
- Connect the black probe to the negative terminal (-)
- Read the Voltage:
Observe the display on the voltmeter. A healthy, fully charged battery should read between 12.4 and 12.7 volts when the engine is off.
- Interpret the Results:
- If the reading is below 12.4 volts, the battery may be weak and could require charging or testing.
- A reading below 12.0 volts usually indicates that the battery is discharged and may need replacement.
- Disconnect the Voltmeter:
Carefully remove the probes from the battery terminals, starting with the black probe and then the red probe to avoid any short circuits.
Following these steps will help you accurately test your car battery’s condition using a voltmeter, ensuring you can make informed decisions about maintenance or replacement.
Interpret Your Battery Test Results and Next Steps

After conducting a test on your car battery using a voltmeter, it’s essential to accurately interpret the results to understand the battery’s condition. A fully charged car battery should register between 12.6 and 12.8 volts when the engine is off. If your reading is below 12.4 volts, the battery may be partially discharged, and below 12.0 volts indicates that it is likely considerably drained or failing.
If your voltmeter indicates a reading of 12.4 volts or lower, proceed to the next steps. First, try to recharge the battery using an appropriate charger. If the battery still tests low after recharging, consider performing a load test, which measures the battery’s ability to deliver current under stress.
For a load test, you can visit an auto parts store, as they often provide this service for free. A reading of 9.6 volts or higher under load indicates a healthy battery. If the voltage drops significantly during the test, it is best to replace the battery.
Should your battery readings indicate issues, check the battery terminals for corrosion or loose connections. Clean the terminals if necessary and ensure they are tightly connected. If problems persist despite these checks and recharges, it’s advisable to consult with a professional or consider replacing your battery entirely.
In conclusion, regularly testing your car battery with a voltmeter and understanding the results will help you maintain optimal vehicle performance and prevent unexpected breakdowns.


